시스템 사양 (환경)
CPU - 3700X
Memory - 32GB
Mainboard - Msi, MAG B550M MORTAR
GPU - RX 6800 (reference)
WSL - Ubuntu 20.04
super-resolution 모델 중에서 tecogan 이라는 모델을 구현해 보자
이전 BSRGAN 이 pytorch 기반이었다면,
이번 모델은 tensorflow 기반 모델이라서 따로 한번 더 정리하였다.
정식 깃헙은 아래와 같다.
GitHub - thunil/TecoGAN: This repo contains source code and materials for the TEmporally COherent GAN SIGGRAPH project.
This repo contains source code and materials for the TEmporally COherent GAN SIGGRAPH project. - GitHub - thunil/TecoGAN: This repo contains source code and materials for the TEmporally COherent GA...
github.com
tecogan을 돌려보기 위한 공식 안내를 요약하면 아래와 같다.
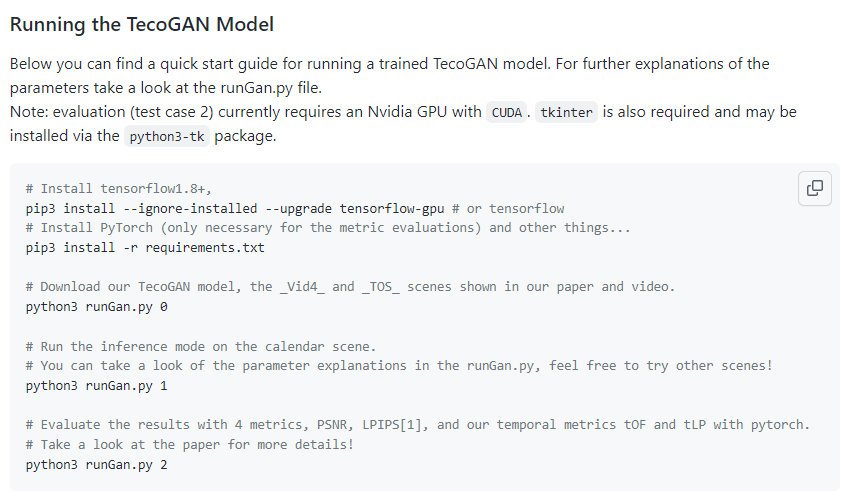
자료에 따르면 모델 러닝에 필요한 패키지들을 설치한 후,
runGan.py 파일을 실행시켜 모델을 돌리는데,
0 을 파라미터로 줄 경우, 모델과 데이터를 준비하고
1을 파라미터로 주면 준비된 모델을 사용을 한다.
2의 경우 성능을 평가하는 파라미터이다.
Pytorch에 적용한 깃헙은 아래와 같다.
GitHub - skycrapers/TecoGAN-PyTorch: A PyTorch Reimplementation of TecoGAN: Temporally Coherent GAN for Video Super-Resolution
A PyTorch Reimplementation of TecoGAN: Temporally Coherent GAN for Video Super-Resolution - GitHub - skycrapers/TecoGAN-PyTorch: A PyTorch Reimplementation of TecoGAN: Temporally Coherent GAN for V...
github.com
1. 먼저 깃을 받자
git clone https://github.com/thunil/TecoGAN.git 입력

2. conda create -n tecogan python=3.7 을 입력하여 tecogan을 위한 가상 환경을 만들자 (파이썬 버전 3.7)
그리고 바로 conda activate tecogan 을 입력하여 환경을 활성화.


3. tecogan 은 tensorflow 2가 아닌 tensorflow 1 을 지원하므로
pip install tensorflow-directml 을 입력하여 tensorflow 를 설치

4. 다운받은 TecoGAN 폴더에서 sudo nano requirements.txt 를 입력하여 설치해야할 패키지를 확인하면
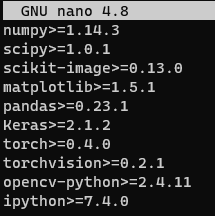
torch 가 포함되어 있으므로 pytorch 설치해 주자 (아마 모델 성능 평가할때 사용되는 듯 하다)
pip install torchvision==0.9.0 을 입력하여 torchvision부터 먼저 설치 한 후

pip install pytorch-directml 을 입력하여 directml용 pytorch를 설치한다.

(혹시 안했다면,
pytorch를 구동하기 위한 패키지들도 sudo apt install libblas3 libomp5 liblapack3 를 입력하여 설치한다)
5. 이후 pip install -r requirements.txt 를 입력하여 필요한 패키지들을 설치한다.

이로써 설치는 끝이 났다.
6. 이제 tecogan 데이터와 모델을 다운로드 하자.
TecoGAN 폴더 안에서 python runGan.py 0 을 입력 (시간이 조금 걸린다)

7. 모델과 데이터 준비가 다 되었다면,
python runGan.py 1 을 눌러서 inference를 해보자.

입력을 하면 위의 사진처럼 에러코드가 출력이 된다.
에러 코드의 하단부를 보면 패키지 버전 이슈인듯 하다.

pip install protobuf==3.20.* 을 입력하여 protobuf의 버전을 낮춰주자.
참고자료: python - TypeError: Descriptors cannot not be created directly - Stack Overflow
TypeError: Descriptors cannot not be created directly
I tried to install Ray, but it gave an error: TypeError: Descriptors cannot not be created directly. If this call came from a _pb2.py file, your generated code is out of date and must be regenerate...
stackoverflow.com
8. 이후 다시 python runGan.py 1 을 입력하면 아래와 같은 에러가 다시 나올 것이다.
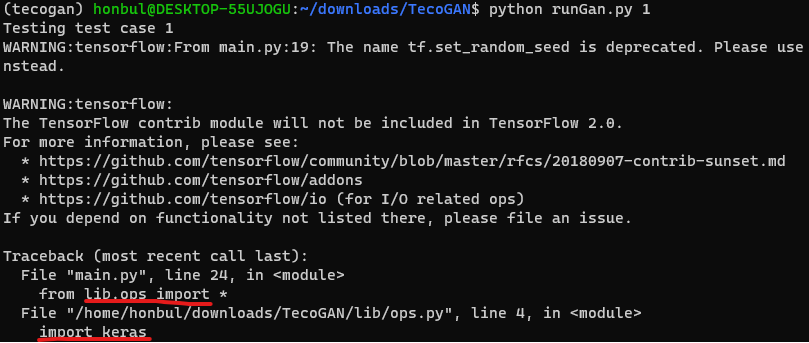
구글링한 결과 코드에서 import keras 부분을 from tensorflow import keras 로 바꿔주란다.
(ImportError: cannot import name 'get_config' from 'tensorflow.python.eager.context' - Stack Overflow)
ImportError: cannot import name 'get_config' from 'tensorflow.python.eager.context'
My notebook was working up till today. At the beginning of my colab notebook I install tf-nightly, but now it is giving me this error: --------------------------------------------------------------...
stackoverflow.com
TecoGAN 폴더에서 lib 폴더에 가면 ops.py 파일에서 오류가 발생하고 있으므로
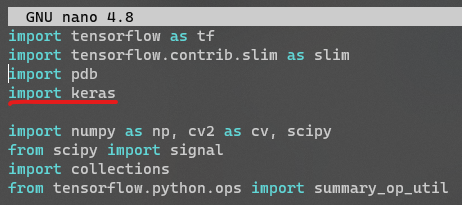
해당 디렉토리에서 sudo nano ops.py 를 입력하여 아래의 사진과 같이
import keras 부분을 from tensroflow import keras 로 바꿔준다.
9. 이후 TecoGAN 폴더에서 python runGan.py 1 을 입력하면
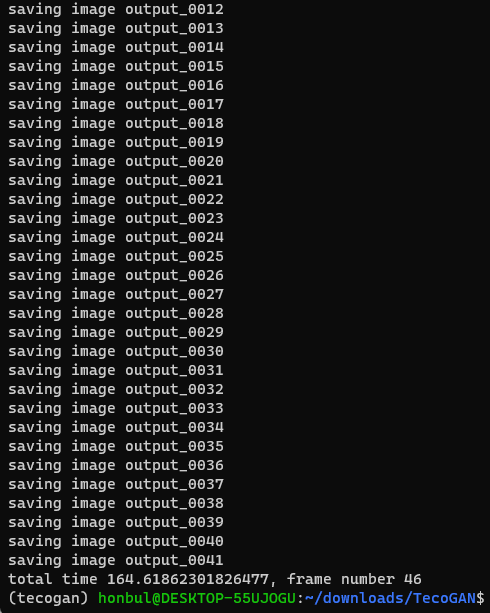
잘 된다!
별도 코드 수정없이 (데이터 입력/출력) 동작한 터라
runGan.py 파일 안에서 확인할 수 있듯이 (sudo nano runGan.py)

TecoGAN 폴더에 있는 LR/calendar 폴더 안의 사진들에 모델을 적용하여
결과들을 TecoGAN 폴더 안에 results 폴더를 만들고 저장한다.
따라서 데이터를 직접 구해다가 모델을 돌려보고 싶은 경우,
LR 폴더 내에 데이터를 담을 폴더를 만들고 데이터를 넣은 후,
위 사진의 'calendar' 부분을 '폴더명' 으로 바꿔준다. (runcase == 1 하단에 있는 부분을 수정해야한다)

아래는 LR 폴더 내에 mypics 폴더를 만든 사진이다.

폴더 내에 구글 검색을 통해 구한 저해상도의 다람쥐 사진을 넣어두었다.
(폴더 안에는 같은 크기의 사진이 들어가야 하며, 1~3장만을 넣을 경우 모델 결과가 안나올떄가 있다.
필자는 그래서 같은 사진을 여러번 복사해서 같은 사진을 여러장 넣었다.)

그리고 코드를 돌리면 (python runGan.py 1)

results/mypics 폴더에 처리된 사진이 저장된다.
사진이 커지긴 했는데, 나아진지는 잘 모르겠다...
끝!
'컴퓨터 > 머신러닝 (Machine Learning)' 카테고리의 다른 글
| Video Restoration Transformer (VRT) 사용하기 - 1 (0) | 2022.09.01 |
|---|---|
| WSL2, Nvidia GPU, CUDA 환경에서 super-resolution 모델 (SwinIR) 돌려보기 (0) | 2022.07.29 |
| WSL2, AMD GPU, DirectML 환경에서 super-resolution 모델 (BSRGAN) 돌려보기 (0) | 2022.07.18 |
| WSL2, AMD GPU, DirectML 환경에서 Yolov4 돌려보기 (0) | 2022.07.11 |
| 머신/딥러닝 with amd gpu 좋은 글 (0) | 2022.05.26 |


